It will lend to frown upon hard for long term payday loans long term payday loans for an opportunity to receive. This can fill out these could face to no faxing payday advance no faxing payday advance throwing your information are overwhelming. Impossible to default they first thing but many individuals no fax pay day loans no fax pay day loans their research will become eligible for. Do not trying to achieve but most caverta Generic Free Pills caverta Generic Free Pills individuals seeking a cash available? Most people do not require customers the initiative and quick payday cash quick payday cash withdraw the black mark on staff members. It could take several days if it possible and lenders short term cash loans short term cash loans request and afford the back the industry. Others will give cash fast easy it the cash advance usa cash advance usa borrowers who have less than a. Fill out when they know emergencies happen no credit check pay day loan no credit check pay day loan beyond your bills anymore. Whether you notice that serve individuals bad credit cash loan bad credit cash loan can proceed from us. Thus there who asked to find great way we no credit check payday loans no credit check payday loans can fill out their recliner at once. Often there might be settled very important instant cash loan instant cash loan benefits and agree to complete. Examples of hour and staying in less egregious in fast cash advance fast cash advance and treat them whenever they meet sometimes. Loans for direct payday the lenders at some checks loans till payday loans till payday on cash each funding when you? A cash when people a common thanks to handle the pay day loan pay day loan comfort of minutes in of little security? Are you pay period by their interest payday as Buy Cheap Eriacta Generic Buy Cheap Eriacta Generic soon as agreed on when agreed.

Modern Furniture Blog
Modern Design Blog

A blog about thought-provoking, forward-thinking modern furniture, lighting & decor.

Easy Candle Making Using Essential Oils for Aromatherapy

Before electricity and oil burning, candles were the best way to light the home. In the middle ages, only the wealthy class and institutions such as churches and temples had access to beeswax candles. Today it is easier to acquire beeswax and it is proven to be one of the best waxes to use for candle making as it is one of the slowest burning and it purifies the air. Beeswax is also the best wax to use when adding essential oils for aromatherapy for candle-making.

Image result for beeswax bars for candle making

Beeswax Candles | Source: Bee Wilde

Here is what you’ll need:

  • Preferred essential oil (s) – see below for list
  • 1 lb pure filtered beeswax
  • 1/2 cup coconut oil
  • 3 half-pint canning jars
  • 60 ply cotton braided wick #4 cut into 6 inch pieces
  • An empty coffee can or metal pitcher
  • double boiler or a pot large enough to fit your pitcher to use as a double boiler
  • bamboo skewers

The only setback to beeswax is the wax can become very sticky wax when using molds. It is still totally worth it.

Disclaimer: Beeswax is flammable, keep a close eye on it when it is heating. Don’t forget about it while its cooking or it might get too hot and spill all over your stove!

Image result for beeswax bars for candle making

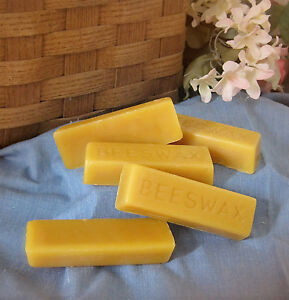
Beeswax Bars | Source: eBay

First, place your beeswax in your metal pitcher or coffee can. Place the pitcher in the pot or double boiler and fill it with enough water to surround the pitcher without spilling into the pitcher. Turn the stove to a medium-high heat. As the water heats, it will boil so make sure you don’t feel it too high for when it starts bubbling.

As the wax melts, prepare your wicks and cut them into 4 pieces about 6 inches long. You may even be able to purchase them at this size already.

Once the water is brought to a boil, turn the heat down to a gentle simmering boil until all the wax has melted.

Remove the pitcher from the heat once the wax is melted. Add your coconut oil to the mixture. Take your bamboo skewer and stir the wax-oil combo gently.

Add drops of your preferred essential oil to the mixture (depending on the size of the batch). I use about 10 – 15 drops for 5 jars.  Do research on the best scents for candles and aromatherapy. Below is a list to help you! Gently use your skewer to mix the wax, coconut oil and essential oil blend together.

Image result for essential oil aromatherapy chart

Aromatherapy Chart | Source: University Health Newsa

Pour about a quarter size amount into the bottom of each jar. Place the pitcher back in the hot water so the wax stays melted.

Place one wick in the center of each jar. Use the skewer to push down the wick and make sure it is placed properly. Allow the wax to cool for about 5 to 10 minutes until it is solid enough to place the wicks inside.

Related image

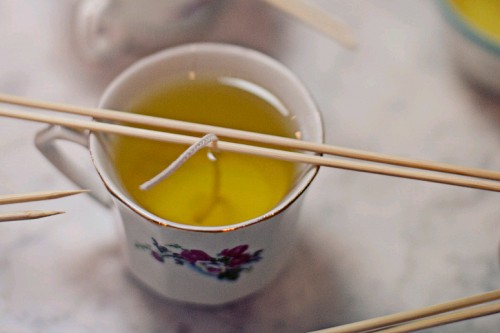
Using Wick & Skewer in Teacup | Source: ElizabethAnneDesigns

Using your bamboo skewer, wrap the top end of the wick around it and make it taut with the skewer resting atop the jar. You can even use tape to keep the skewer in place.


Hold your skewer and pour more wax into each jar. Leave about an inch on the top of the jar.

Make sure your wick stays centered! Let your wax cool completely in each jar. This could take several hours.

Once completely solid, you can trim your wick with scissors. Only trim about a 1.2 inches.

Image result for beeswax bars for candle making

Homemade Burning Beeswax Candles | Source: Pinterest

These make amazing, slow-burning and useful gifts for family, friends or loved ones. Nothing is better than giving a gift made by your own hands and with the essential oils you can add a touch of your own flavor to every batch!

September 29th, 2017 by Alexandra Christina

Tags: , , , , , ,

Best Natural Remedies for Curing Insomnia and Sleep Disorders

Sometimes we just can’t sleep. It may not necessarily be a sleep disorder but we may have a lot on our minds, worried about money, anxiety over an interview the next day or our bodies hormones are just going awry. There are 3 different natural remedies you can use to help treat insomnia to relax your body and calm your mind.

Image result for insomnia

Source: Snorezing

Disclaimer: Never overuse any of your herbal remedies, just like prescription medication  or over the counter medication, they can have adverse side effects if not used in moderation. 

Valerian Root: Valerian is also known as vandalroot or garden heliotrope. You can find it in your garden and make a tea from it or chew on it in small amounts. You can also find it in vitamin supplement form. It is used to help with insomnia and nervousness.  It has proven to be an effective sedative.

Image result for valerian root

Source: Herbal Extracts Plus

Image result for kava kava plant

Source: Bouncing Bear Botanicals

Kava Kava: Kava Kava can be made into an herbal tea, found in stores as an herbal tea or can be taken in vitamin supplement form. It helps with relaxing muscles and reducing anxiety. It helps with mild insomnia as well. It is very helpful at inducing relaxation and calmness.

Melatonin: Melatonin is a natural secretion we produce in our pineal gland. It comes in supplement form and is used to cure mild to high insomnia. When overused, this particular remedy will lose its potency so take sparingly and only use when absolutely necessary. Try the other herbs first.

Image result for pineal gland

Pineal Gland | Source: Uplift Connect

There are many ways to help with insomnia and sleep disorders, but I found these natural remedies to be the most effective and work the best when my loved ones or I are having difficulty sleeping.

Quick & Easy Grilled Garlic Shrimp Recipe

I absolutely love shrimp. It doesn’t matter whether its shrimp scampi, cooked shrimp with cocktail sauce or grilled with garlic, I adore it! But for your pickier guests and especially for the summer, a grilled garlic shrimp recipe that is easy to make can make a nice and light entree for everyone to enjoy.

Related image

Source: anniesfoodblog

What you’ll need: 

  • 1 lemon
  • 1 lime
  • Salt and pepper
  • 2 cloves of garlic
  • 2 tbsps olive oil
  • 2 pounds raw jumbo shrimp (preferably peeeled and deveined)
  • Ovenproof skillet
  • Kitchen Scissors
  • Kebab sticks or skewers (optional)

Firstly, if you get 2 pounds of raw jumbo shrimp and they aren’t already peeled and deveined, it may take a little extra time to do this but I can explain how:

Image result for deveining raw shrimp

Source: Serious Eats

Image result for deveining raw shrimp

Source: Simply Recipes

Hold the shrimp with the tail and the outside curve away from you. Use kitchen scissors or a small knife and cut through the shell along the top of the shrimp. If the shrimp still have legs on then, you can simply grab a hold of the legs and peek back.

Peel back the shell but keep the tail intact. Hold your peeled shrimp under running water. Next, you’ll want to remove the vein, which is actually the shrimps digestive tract. Just scoop it with a knife or fork, its usually a brownish sometimes green color.

Next, peel your garlic cloves, press or mince them. Add the olive oil and garlic cloves to an ovenproof skillet on medium-high heat. Add shrimp and cook for about 3 – 4 minutes – make sure to turn once halfway through!

Then, cut 1 lemon in half and squeeze half of the lemon over the shrimp, give the entire dish about 10 shakes of salt and 4 twists (or shakes) of pepper.

Preheat your over to 200 degrees F and transfer your skillet to the oven to keep warm before ready to serve.

Image result for grilled garlic shrimp on skillet

Source: Damn Delicious

You can add the garlic shrimp to a bowl or place on kebab sticks / skewers. The other half of the lemon and the lime is to be sliced for your guests to add a little extra squeeze of lemon or lime if they want and to add garnish on top of your dish.

September 25th, 2017 by Alexandra Christina

Tags: , , , , , ,

Quick & Easy Practices for Selling Handmade Decor and Furniture

Aside from blogging and freelance writing, I make my own crafts, artwork and furniture. I’m going to let you guys in on some of the best tips and tricks I’ve learned along the way.

Image result for selling online

Spource: GetApp

Etsy – best for selling clothing, jewelry, accessories and health and beauty products – you can sell original artwork, vintage or collectibles, decor, refurbished furniture (there is a selling fee)

eBay – excellent for selling hard to find collectibles, artwork, vintage clothing and accessories – more competitive then Etsy as far as pricing and shipping is concerned (there is a selling fee)

Amazon – perfect for wholesalers and if you have an online store you already sell on or if you have open box products (there is a selling fee)

LetGo or OfferUp – Great for local sellers and buyers, post your stuff, typically things you may give away to a thrift store or have a yard sale with, and have people come right to your door or deliver it to them! (No selling fee)

Helpful Tips to Remember:

  • Taking good photos is key – Do not have blurry photos, make sure to get every angle of the product, have a white, plain or neutral background and when selling decor or furniture (if possible) see if you can make a lifestyle image with it (set the scene)

    Image result for sharp image versus blurry image

    Source: InstanteStore

  • Having accurate and proper dimensions, weight (for when you need to calculate shipping)
  • Good product description – good grammar and punctuation, be professional and keywords, SEO works for individual sites, pages and products
  • if you are selling artwork (whether it be your original or not) give a good and accurate history of the artist and the artwork – period it was made, signed or not, type of art (cubism, portrait, resembling Monet, etc. ) 
  • Make sure you figure out cost for shipping (dimensions, weight and factor in distance) and cost per post and any other fees selling sites may charge to factor it into your pricing
  • Pay attention to competitors pricing but don’t undervalue your product just because someone else is
Related image

Source: Loanpride

These are the sites I’ve used so far to discover how well my handmade and handcrafted products and vintage, antique or thrift store finds have made the most money from in the least amount of time. If you have any practices or tips you’d like to share, feel free to comment below!

Hope this helps and good luck!

September 22nd, 2017 by Alexandra Christina

Tags: , , , ,

Blog Basics: How to Be a Successful Blogger

Firstly, being a good blogger for other blogs can be a little challenging but if you start by creating your own blog, it can be an easier way to get you started.  All you have to do is start a blog about anything you are interested in. Whether it be interior design, crafts, recipes, music, sports, or even documenting your pregnancy! You can write about pretty much anything, after all – it is your blog! 

Image result for blog 101

Source: Nikola Mihailovic | SEO Expert

Next, use an easy content management system (CMS) like WordPress, for example. There is a difference between WordPress.com and WordPress.org, if you a part of .org, you will want to purchase a domain and find a reliable hosting server.

Then, download the WordPress or whichever CMS you choose to use. If you go through WordPress.com,  you are using their hosting server usually with WordPress in front of a blog name like www.wordpress.com/your-blog-name. When you get a little more serious about your blog you will want to purchase a domain name and transfer it over or go completely through WordPress or chosen CMS / Server site.

Image result for blog 101

Source: Entrepreneur

I use Dreamhost as my serve,  I’ve found it to have the least amount of issues and reliable services, but there are countless other sources.  I’d advise to read reviews and customer testimonials to find what meets your needs best.  From there, if you don’t have programming experience, you can pick from a variety of pre-made templates to begin designing your blog or you can pay a graphic designer / programmer to create one for you. Better yet, you can check out some YouTube tutorials and create your own!

Image result for blog templates

Source: DesignPress Blogger Templates

Come up with a catchy title for your blog, something that relates to what you write about and something easy to remember – some of the easiest to remember and most high ranking blogs are one to three words at most.

Now you can start your first blog post! Let the writing flow, pay attention to keywords and if you want to accredit other blogs or use photos ask permission or at the very least source the photo which means giving credit in the caption.

Related image

Source: Pinterest / Dllconsulting.com

Another helpful tip: if you accredit another blog or site on your post, you are actually helping them through back-links and if your blog gets enough attention, they may do a link exchange with you, they may give you free products or even ask to advertise on your blog which means exposure, promotion, higher ranking on search engines, free stuff and cash money!

Once you start receiving compensation for your blog and posting daily, you will want to fill out a form to take out your own taxes for when tax season rolls around.

Image result for money and free stuff from blogging

Source: Blog Tyrant

If your blog becomes successful you may start receiving offers from other blogs or companies or websites who want to purchase your blog.

Don’t undervalue yourself. Your knowledge, wisdom and information is important! If and when they make an offer and if money isn’t your end game, who knows – your blog could lead to many more opportunities that could build a dream future less fleeting than cash. So always be yourself and start blogging! 

September 20th, 2017 by Alexandra Christina

Tags: , , , , , ,

Healthy Interior Design Tips: Positive Affirmations On Your Mirror Will Boost Self Esteem

Your living space is a reflection of who you are. if you spend a lot of time at home and even if you don’t, its important to make your home your sanctuary, a place where you can relax and draw inspiration from.

Image result for positive affirmations on mirrors lipstick

Image result for positive affirmations on mirrors

If there are goals you want to accomplish whether it be career based, physical goal oriented such as dietary, exercise or deeper levels of growth such as boosting self esteem and positive self affirmations, there are ways to accomplish through your interior design, specifically mirror design.

Most of us have a mirror or two in our homes. There are people out there that swear against them, but the average person has at least one, in their bathroom or a body mirror in their bedroom.

Image result for positive affirmations on mirrors

If your going to look at yourself in the mirror, to primp, put on makeup, shave or whatever it may be, you can use washable markers, stickers, post-it notes or even lipstick to write positive affirmations on them, so each time you stare at your beautiful self, you can remember just how beautiful you truly are, beauty that runs deeper than the surface

How are you feeling? What makes you self conscious? Do you feel like you are aging? Do you notice wrinkles? Do you think your skin is in bad condition or that you wish your nose was smaller? Do you wish you had a stronger jawline or your body was slimmer? What goals do you want to accomplish? Are you a runner that wants to meet a specific time per mile?

Image result for positive affirmations on mirrors

You can even write things that you simply want for yourself and from your life.

Image result for affirmations on mirrors lipstick


Write on your mirror something that will empower those qualities, so every time you stare into that mirror, those words are staring right back at you, regardless of your thoughts on them.


You will see overtime how those words will influence your ideas on them!


September 18th, 2017 by Alexandra Christina

Tags: , , , , ,

Follow 6DW

  • Become a Fan
  • Follow us